TIP Product Countdown for WooCommerce allows you to manage the countdown timer individually for every product. All settings are available inside a dedicated Countdown tab within the Product Data panel of each product.
From here, you can enable the countdown, choose a layout, define the end date, and customize the text displayed before and after the timer.
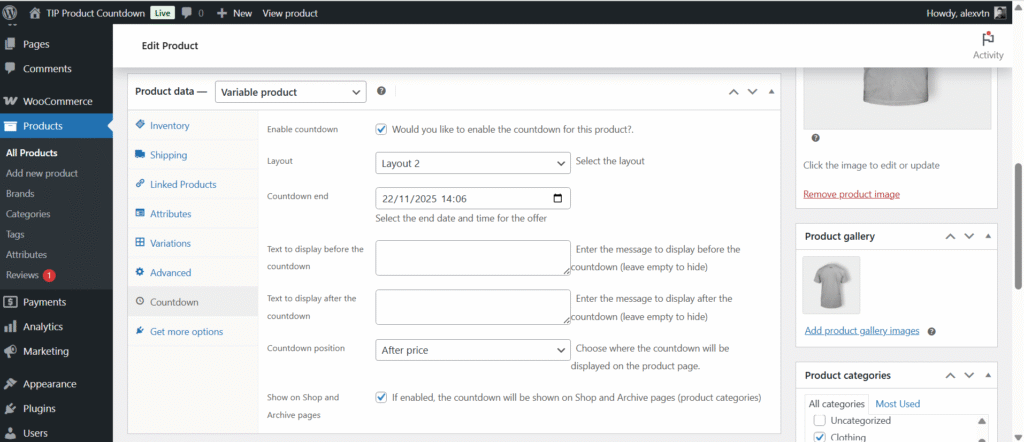
Below is an overview of all available options.
1. Enable Countdown
Enable this option to activate the countdown for the selected product.
If the checkbox is disabled, the countdown will not be displayed anywhere for this product.
2. Layout
Choose one of the five available countdown layouts.
Each layout offers a different visual style, allowing you to match the countdown design with your theme and product page layout.
3. Countdown End
Select the date and time when the countdown should end.
This timer is independent from sale prices and product discounts, giving you full freedom to create urgency whenever you want.
4. Text to Display Before the Countdown
Use this field to add a short message that appears above the countdown.
If left empty, no text will be displayed.
Examples include:
- Time remaining:
- Offer ends in:
5. Text to Display After the Countdown
This message appears below the countdown.
If left empty, the message is hidden.
Examples include:
- Don’t miss this chance!
- Limited-time offer.
6. Countdown Position
Choose where the countdown should appear on the product page.
You can place it:
- Before the product title
- After the price
- After the Add to Cart button
This lets you decide how prominent the countdown should be in the product layout.
7. Show on Shop and Archive Pages
When enabled, the countdown will also be displayed:
- on the Shop page,
- and on category pages (Archive pages).
This is useful for promoting flash sales or time-sensitive promotions directly in product listings.